
Prepare :
1. tftp server , 載點
2. Web server , 我習慣用 hfs , 載點
3. ESXi 6.5 or 6.7 iso source , 載點
PS: 若 Serva也是不錯工具免費版目前最多佈署3個sessions,兼併很多角色Server , 載點
Procedure :
step01. Create tftp root directory (e.g. I create directory at c:\tmp\tftp_root )
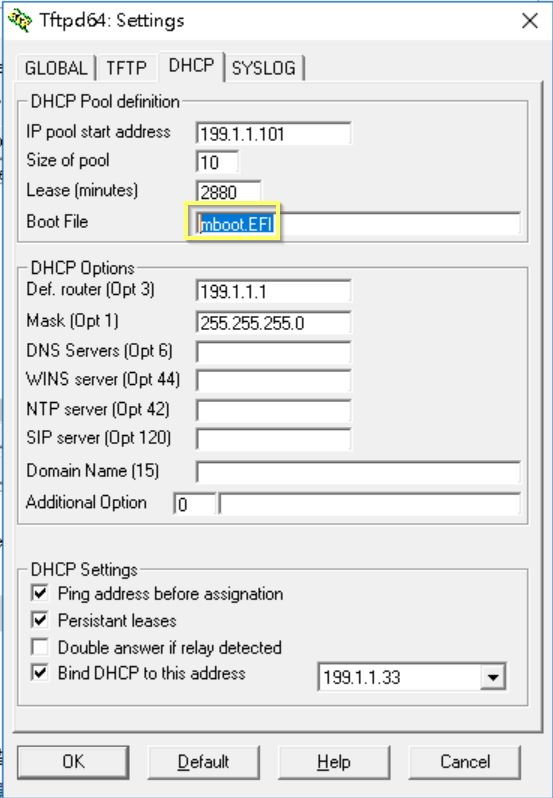
step02.
> perform tftpd64.exe > Settings > DHCP ‘Boot File’ 加入一串 mboot.EFI
> 設定DHCP派送IP , IP pool start address (e.g. 我設定是 199.1.1.101開始,最多10組DHCP IP) ;需不需要Gateway再個案設定之. Mask (Opt 1) 設定為 255.255.255.0
step03. extract ESXi 6.5 or 6.7 ISO put under tftp directory (e.g. c:\tmp\tftp_root\ESXi67 )
step04. 將 ESXi source 目錄 \EFI\BOOT\BOOTX64.EFI 複製到你預設 tftp root directory底下,更名為 mboot.EFI (e.g. c:\tmp\tftp_root\mboot.EFI )
step05. copy ESXi source ‘ EFI\BOOT\BOOT.CFG ‘ put ur tftp root directory (e.g. c:\tmp\tftp_root\BOOT.CFG )
step06. edit BOOT.CFG
PS:刪除此範本所有的 ‘ / ‘ 假若我的安裝source ‘ESXi67’在 c:\tmp\tftp_root\ESXi67 ;我tftp root 錄路徑為 ‘ / ‘ ; 多加一串 ‘prefix=‘ ; 存檔後再複蓋 ESXi source \ 底下BOOT.CFG
———————————BOOT.CFG Start———————————————
bootstate=0
title=Loading ESXi installer
timeout=5
prefix=ESXi67
kernel=b.b00
kernelopt=ks=http://199.1.1.1/ks/ks.cfg
modules=jumpstrt.gz — useropts.gz — features.gz — k.b00 — chardevs.b00 — user.b00 — procfs.b00 — uc_intel.b00 — uc_amd.b00 — vmx.v00 — vim.v00 — sb.v00 — s.v00 — ata_liba.v00 — ata_pata.v00 — ata_pata.v01 — ata_pata.v02 — ata_pata.v03 — ata_pata.v04 — ata_pata.v05 — ata_pata.v06 — ata_pata.v07 — block_cc.v00 — bnxtnet.v00 — brcmfcoe.v00 — char_ran.v00 — ehci_ehc.v00 — elxiscsi.v00 — elxnet.v00 — hid_hid.v00 — i40en.v00 — iavmd.v00 — igbn.v00 — ima_qla4.v00 — ipmi_ipm.v00 — ipmi_ipm.v01 — ipmi_ipm.v02 — iser.v00 — ixgben.v00 — lpfc.v00 — lpnic.v00 — lsi_mr3.v00 — lsi_msgp.v00 — lsi_msgp.v01 — lsi_msgp.v02 — misc_cni.v00 — misc_dri.v00 — mtip32xx.v00 — ne1000.v00 — nenic.v00 — net_bnx2.v00 — net_bnx2.v01 — net_cdc_.v00 — net_cnic.v00 — net_e100.v00 — net_e100.v01 — net_enic.v00 — net_fcoe.v00 — net_forc.v00 — net_igb.v00 — net_ixgb.v00 — net_libf.v00 — net_mlx4.v00 — net_mlx4.v01 — net_nx_n.v00 — net_tg3.v00 — net_usbn.v00 — net_vmxn.v00 — nhpsa.v00 — nmlx4_co.v00 — nmlx4_en.v00 — nmlx4_rd.v00 — nmlx5_co.v00 — nmlx5_rd.v00 — ntg3.v00 — nvme.v00 — nvmxnet3.v00 — nvmxnet3.v01 — ohci_usb.v00 — pvscsi.v00 — qcnic.v00 — qedentv.v00 — qfle3.v00 — qfle3f.v00 — qfle3i.v00 — qflge.v00 — sata_ahc.v00 — sata_ata.v00 — sata_sat.v00 — sata_sat.v01 — sata_sat.v02 — sata_sat.v03 — sata_sat.v04 — scsi_aac.v00 — scsi_adp.v00 — scsi_aic.v00 — scsi_bnx.v00 — scsi_bnx.v01 — scsi_fni.v00 — scsi_hps.v00 — scsi_ips.v00 — scsi_isc.v00 — scsi_lib.v00 — scsi_meg.v00 — scsi_meg.v01 — scsi_meg.v02 — scsi_mpt.v00 — scsi_mpt.v01 — scsi_mpt.v02 — scsi_qla.v00 — shim_isc.v00 — shim_isc.v01 — shim_lib.v00 — shim_lib.v01 — shim_lib.v02 — shim_lib.v03 — shim_lib.v04 — shim_lib.v05 — shim_vmk.v00 — shim_vmk.v01 — shim_vmk.v02 — smartpqi.v00 — uhci_usb.v00 — usb_stor.v00 — usbcore_.v00 — vmkata.v00 — vmkfcoe.v00 — vmkplexe.v00 — vmkusb.v00 — vmw_ahci.v00 — xhci_xhc.v00 — elx_esx_.v00 — btldr.t00 — weaselin.t00 — esx_dvfi.v00 — esx_ui.v00 — lsu_hp_h.v00 — lsu_lsi_.v00 — lsu_lsi_.v01 — lsu_lsi_.v02 — lsu_lsi_.v03 — native_m.v00 — qlnative.v00 — rste.v00 — vmware_e.v00 — vsan.v00 — vsanheal.v00 — vsanmgmt.v00 — tools.t00 — xorg.v00 — imgdb.tgz — imgpayld.tgz
build=
updated=0
———————————BOOT.CFG End———————————————-
說明:
prefix=ESXi67
kernel=b.b00 // PS. v6.7僅剩 b.b00 不若之前有 tboot.b00 檔案
kernelopt=ks=http://199.1.1.1/ks/ks.cfg // PS. 若有需要無人值守必要有作KickStart編輯; e.g. 密碼 ,
step07. clock hfs.exe , (e.g. My KickStart directory hfs root put c:\tmp\tftp_root\ks )
step08. edit ks.cfg
———————————ks.cfg End———————————————-
#
# Sample scripted installation file
#
# Accept the VMware End User License Agreement
vmaccepteula
# Set the root password for the DCUI and Tech Support Mode
rootpw P@ssw0rd!
# Install on the first local disk available on machine
install –firstdisk –overwritevmfs
# Set the network to DHCP on the first network adapter
network –bootproto=dhcp –device=vmnic0
reboot
# A sample post-install script
%post –interpreter=python –ignorefailure=true
import time
stampFile = open(‘/finished.stamp’, mode=’w’)
stampFile.write( time.asctime() )
———————————ks.cfg End———————————————-
PS: About the Default ks.cfg Installation Script 可以參考 ‘ vsphere-esxi-67-installation-setup-guide.pdf ‘ page 77
Reference :
1. xenappblog – Automatically Install VMware ESXi 6.7 through PXE boot
2. Virtual Reality – Automating Esxi Deployment Using PXE Boot and Kickstart
3. VMware Docs – 使用 TFTP 對 ESXi 安裝程式進行 PXE 開機
